How to Change Cello Strings Without Breaking Them

Katherine Dvoskin, Co-Founder of K&M Music School
I hope you enjoy this blog post! If you're interested in scheduling a free trial lesson, just click.
Author: Katherine Dvoskin | Co-Founder of K&M Music School
Published April 4th, 2025
Changing cello strings without breaking them requires proper technique and patience. Learn essential steps for safe string replacement, avoid costly breakage, and maintain your instrument's sound quality with our expert guide for every cello student and teacher.
| String Type | Best Features | Recommended Brand | When to Replace |
|---|---|---|---|
| A String (thinnest) | Most prone to breakage, needs gentle handling | Larsen, Jargar | Every 3-6 months |
| D String | Medium thickness, good balance | Thomastik-Infeld, D'Addario | Every 6-9 months |
| G String | Thicker, less likely to break | Spirocore, Evah Pirazzi | Every 9-12 months |
| C String (thickest) | Lowest pitched, needs firm seating | Spirocore, Helicore | Every 9-12 months |

Music Lessons in San Diego with K&M Music School
1 Expert Music Lessons
We offer Piano, Violin, Cello, Guitar, Ukulele, Saxophone, Bassoon, Harp, Voice, and Toddler group lessons for students of all ages and skill levels.
2 Why Choose Us?
- 🎶 Boosts focus and self-discipline
- 🎵 Strengthens cognitive skills
- 🎼 Enhances cultural understanding
- 🎤 Builds confidence through recitals
3 We Welcome Adults Too!
Last Saturday, I broke my third A string while trying to replace it. My hands were shaking, and I was late for rehearsal. That's when I decided enough was enough – I needed to finally master this essential cello maintenance skill. If you've ever felt that pit in your stomach when you hear that dreaded ping of a breaking string, this guide on how to change cello strings without breaking them is for you.
Changing cello strings without breaking them isn't just about saving money (though at $30-80 per string, that's reason enough!). It's about keeping your instrument in good shape and avoiding the panic of string breaks before performances. After attending an online cello course and speaking with my cello teacher (consider the benefits of lessons with a local teacher!), I've compiled everything I've learned about proper string replacement techniques to help fellow cello students maintain their instruments.
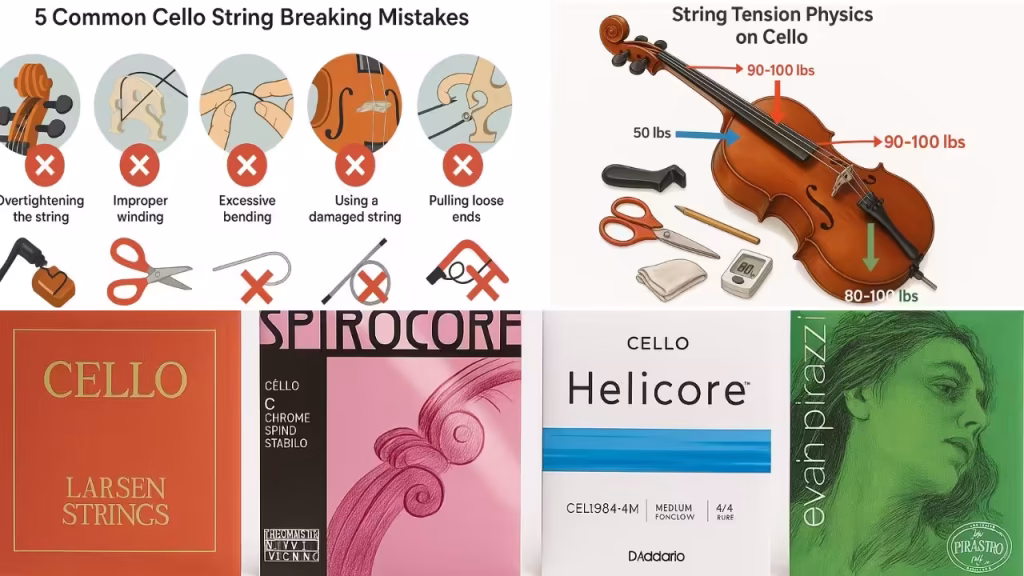
Why Cello Strings Break During Changes
My cello teacher once told me,
“Respect the tension, and the string will respect you back.”I didn't fully get it until I understood the physics involved with string tension.
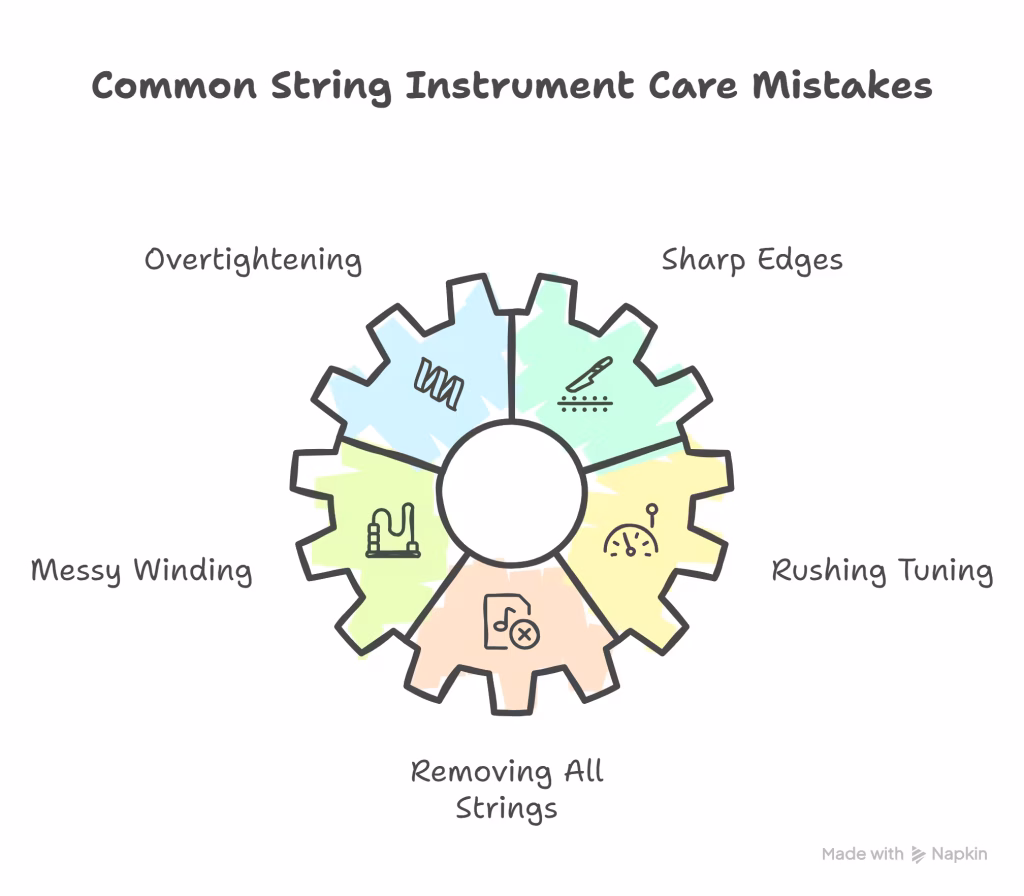
Tension Issues
Cello strings are like tightropes under serious pressure. They're pulling with around 80-100 pounds of force when tuned properly. That's roughly the weight of a middle schooler hanging from each string! No wonder a string breaks when we're not careful with our instrument.
My friend Sarah, who studied at an undergraduate music school, puts it bluntly:
“Most string breaks happen because people get impatient. They crank the peg too quickly and snap – there goes $50.”
Common Mistakes That Cause Breakage
I've made every mistake on this list during my cello discovery journey (sometimes twice):
- Overtightening: Forcing strings beyond what they can handle
- Sharp edges: Not checking for rough spots that can slice through strings
- Messy winding: Letting windings cross over each other on the peg
- Rushing the tuning: Bringing strings up to pitch too quickly with your tuner
- Removing all strings at once: The fastest way to a costly repair bill for your cello
String Quality and Age Factors
I learned this lesson when I was too broke to replace my cello strings regularly in college. Old strings aren't just dull-sounding – they're brittle. The cheap strings I bought online snapped within days, while the quality all-around string set my teacher recommended lasted months. Good string quality makes a significant difference in how your instrument sounds.
Essential Tools and Materials for Changing Cello Strings
Before I organized my string-changing kit, I'd scramble around looking for scissors, dropping pegs, and getting frustrated when my string breaks. Now I can swap a string on my cello in under 10 minutes.

Must-Have Tools
- String winder: This $5 tool has saved me hours of tedious turning
- Small scissors: Kitchen scissors work fine, but tiny ones are better for string trimming
- Clean cloth: An old t-shirt works great for cleaning your cello
- Pencil: The secret weapon for string groove lubrication (more on this later)
- Digital tuner: Because our ears lie to us when we're anxious about string breaks
Recommended String Brands
After trying practically every brand out there for my cello, here's what I've found:
| Brand | Features | Best For |
|---|---|---|
| Larsen | Warm, rich tone but pricey | When you need to impress someone |
| Thomastik-Spirocore | Bright, loud, great for orchestra music | When you need to be heard |
| D'Addario Helicore | Decent sound, won't break the bank | Students or backup strings |
| Pirastro Evah Pirazzi | Powerful but expensive | Solo performances |
| Jargar | Clear, focused sound | When you need reliability |
My cello teacher swears by Larsen A and D with Spirocore G and C. I tried this combination of new strings and never looked back – though my wallet sometimes wishes I would.
Optional Accessories
- Peg compound: Magic goop that makes sticky pegs turn smoothly
- String gauge: For the perfectionists among us measuring string height
- Humidifier: Because dry cellos make sad sounds and affect string life
Preparing Your Cello for String Replacement
The hour I spent watching my cello teacher change strings taught me more than years of fumbling on my own. Preparation is everything when learning how to change cello strings without breaking them.
Positioning Your Cello Correctly
I used to lay my cello flat on the bed. Big mistake. Now I sit in my armless practice chair and hold the instrument between my knees like I'm playing. This gives me the best control and visibility of the string groove. (Ensuring correct posture and hand technique is helpful here.)
My worst string-changing disaster happened when my cello slipped and the bridge fell. Now I make sure my instrument is stable before I start replacing any string.
Examining Current Strings
Before yanking off old strings, I take a good look at my instrument – even snap a phone pic – to remember:
- How the strings wind around the pegs
- How they sit in the bridge grooves
- How they attach to the tailpiece
This visual reference of my cello has saved me from plenty of head-scratching moments when I need to move the string into position.
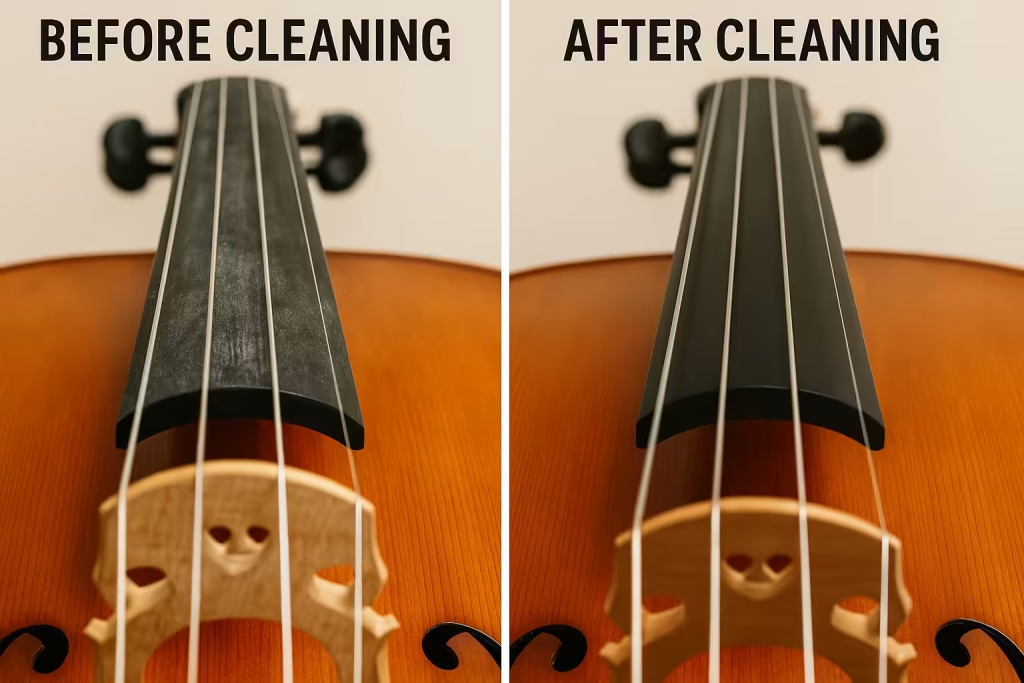
Cleaning the Fingerboard
This is the perfect opportunity to wipe away that gross buildup of rosin, skin oils, and who-knows-what from your fingerboard. I was shocked at the black gunk that came off the first time I did this properly on my cello.
Pre-Change Checklist
I've taped this list inside my cello case:
- ✓ Cello securely positioned
- ✓ All tools within arm's reach
- ✓ New strings unpacked and identified
- ✓ Pencil for string groove lubrication
- ✓ Tuner app open on phone
Step-by-Step Guide to Changing Cello Strings Without Breaking Them
After experiencing many string breaks in every possible way, I've finally nailed down a foolproof process for changing cello strings.
Important Rule: Change One String at a Time
The first time I changed strings, I thought I'd be efficient and remove all the strings from my cello. The bridge collapsed, the soundpost shifted, and I ended up with a $200 repair bill. Learn from my mistake – one string at a time, always.
Loosening the Old String
- Gently turn the peg toward you (think: "righty loosey" when facing the scroll)
- Keep going until the string flops around with no tension
- Support the bridge with a finger while loosening to prevent tilting
Last month, I was in a rush and loosened too quickly. The bridge on my cello leaned so far it nearly fell. Now I take my time with this step to prevent string breaks.
Removing the Old String
- Once floppy, carefully unwind the old string from the peg
- Turn the fine tuner counterclockwise until it's loose
- Pull the string free from the fine tuner or tailpiece
- Lift the string away from the instrument
I save my old strings in labeled envelopes. They've saved rehearsals when friends have had emergency string breaks at music school.
Installing the New String at the Tailpiece
- Figure out which string you're replacing (sounds obvious, but I've mixed them up!)
- Thread the ball end into the correct tailpiece slot or fine tuner
- Make sure it's seated properly – I give it a gentle tug to check
- Lay the new string over the bridge in the correct groove
The first time I changed my A string, I didn't seat the ball end properly. It popped out halfway through tuning and nearly hit me in the face! Proper seating in the tailpiece is crucial for how to change cello strings without breaking them.

Threading Through the Peg Hole
- Guide the string through the proper peg hole on your cello
- Leave about an inch of extra string beyond the hole
- Start turning the peg away from you
I like to bend the string end slightly before inserting it. This helps it stay put while I start winding the new string.
Proper Winding Technique
This took me years to get right:
- Wind each wrap next to (not on top of) the previous one
- First turn should go toward the outside of the pegbox
- Keep winding until the string starts to tighten
- Guide the windings downward toward the pegbox wall
My cello teacher compared this to winding a garden hose – neat coils side by side, not a tangled mess that might cause string breaks.
Tension Management
- Increase tension gradually with several pauses – I count to 10 between turns
- Check that the string sits properly in its groove
- Guide the string into place if needed
- Never rush to pitch – patience prevents string breaks
I once broke an expensive A string by rushing this step. Now I think of it as slowly waking up the new string, not jolting it out of bed.
Tuning the New String
- Get close to pitch with the peg, then use fine tuners for precision (If you're new, check out this beginner's guide to tuning your cello.)
- Tune slightly flat first, then gradually reach proper pitch with your tuner
- Accept that you'll be retuning frequently for the first week
New strings are like new shoes – they need breaking in. I expect to tune my cello 3-4 times during each practice session with new strings until they settle.
String-Specific Replacement Techniques
Each string has its own personality and challenges, which is important to know for cello students.
A String (Highest String)
The prima donna of cello strings – thin, temperamental, and prone to string breaks. I treat my A string like it might snap at any moment:
- Use the lightest touch possible when pressing into the string groove
- Apply pencil graphite generously to reduce friction
- Tune with tiny adjustments, taking breaks between each to prevent string breaks
D String
The reliable middle manager of the string family on your cello:
- Check that the bridge groove is smooth and appropriately sized
- Ensure it's properly anchored at the tailpiece
- Create neat, even windings on the peg
G String
The sturdy workhorse of your cello that rarely breaks but can be stubborn:
- Be prepared to use a bit more force to bend it at the pegbox
- Make sure you have enough wraps on the peg for good grip
- Double-check the string groove width – it should be appropriate for the thicker string
C String (Lowest String)
The big boss of your cello – thick, commanding, and somewhat inflexible:
- Seat it firmly in the tailpiece
- Use fewer windings than other strings
- Make sure it doesn't rub against anything it shouldn't
Music Lessons in San Diego with K&M Music School
1 Expert Music Lessons
We offer Piano, Violin, Cello, Guitar, Ukulele, Saxophone, Bassoon, Harp, Voice, and Toddler group lessons for students of all ages and skill levels.
2 Why Choose Us?
- 🎶 Boosts focus and self-discipline
- 🎵 Strengthens cognitive skills
- 🎼 Enhances cultural understanding
- 🎤 Builds confidence through recitals
3 We Welcome Adults Too!
Preventing String Breaks: Expert Tips
These tricks have saved me countless strings and dollars during my cello discovery journey.
Using Graphite to Reduce Friction
This $2 solution has saved me hundreds in broken strings. Before installing any new string, I rub a soft pencil in the bridge and nut grooves. This graphite acts like magic lube that helps the string move smoothly instead of catching and breaking.
The day my cello teacher showed me this trick changed my life.
“It's the oldest trick in the book,”he said,
“but most cello students never learn it.”
Maintaining Proper Bridge Alignment
Your bridge should stand straight, not leaning forward or backward:
- It should be perpendicular to the top of the cello
- The feet should make full contact with the cello body
- It should be centered between the f-holes
- The higher side should sit under the C string
I check my bridge position every time I change strings by looking at it from the side at eye level.
Checking for Sharp Edges
After experiencing three string breaks in a month, I finally ran my finger along the bridge groove and found a tiny sharp edge. Five minutes with fine sandpaper fixed a problem that had cost me nearly $100 in strings.
- Feel along the bridge grooves for any roughness
- Check the nut slots where the strings pass through
- Inspect fine tuners for burrs or sharp spots
If you find rough spots, have a cello teacher smooth them (or very carefully do it yourself)
Proper Peg Adjustment
Well-fitting pegs make all the difference for your instrument:
- They should turn smoothly without slipping or sticking
- Peg compound works wonders on stubborn pegs
- The secret is gentle inward pressure while turning
My C peg used to stick so badly I'd avoid changing the string. A dab of peg compound fixed it in seconds.
Common String Changing Problems and Solutions
Even professionals run into these issues with their cello. Here's how to fix them.
Slipping Pegs
Problem: You tighten the peg, but it just spins back.
Solution:
- Take the string off and apply peg compound (or chalk in a pinch)
- Push firmly inward while turning the peg
- If it's a constant problem, a cello teacher can refit the pegs
My D peg was a notorious slipper. I tried everything until my teacher showed me how to properly push in while turning – a game changer for my instrument.
Bridge Alignment Issues
Problem: After changing strings, your bridge is leaning.
Solution:
- Slightly loosen all strings
- Carefully straighten the bridge with gentle pressure
- Re-tighten strings while watching the bridge
I keep an old business card with a straight edge in my case to check bridge alignment after string changes.
String Buzz After Replacement
Problem: Your new string makes an annoying buzz when played.
Solution:
- Check if the bridge height and groove depth are appropriate
- Make sure the string is seated properly in the nut
- Look for spots where the string might be touching the fingerboard
I once spent weeks battling a mysterious buzz until I realized the string wasn't properly seated in the nut groove of my cello.
Fine Tuner Problems
Problem: The fine tuner won't adjust or bottoms out.
Solution:
- Reset the fine tuner to middle position before installing the string
- Use the peg for big adjustments, fine tuner for small tweaks
- Replace damaged fine tuners – they're relatively inexpensive
I keep spare fine tuners in my case after a screw stripped during an important music performance.
Breaking in Your New Cello Strings
New strings are like new jeans – they need time to feel comfortable on your instrument.
Settlement Period
Don't panic when your new strings won't stay in tune. It's normal for them to stretch and require frequent tuning for about a week. This isn't a sign of poor installation – it's just physics of new strings.
I once had a new cello student in tears because she thought she'd done something wrong when her new strings kept going flat. I showed her my tuning log – 12 adjustments in the first day with new strings!
Playing Techniques for New Strings
Help your strings settle in faster:
- Play long, sustained notes with medium pressure
- Use a bit more rosin than usual at first
- Save your aggressive techniques for after the break-in period
- Play scales and arpeggios to work all parts of the strings
My cello teacher recommends playing Bach's first cello suite prelude to break in new strings – it works all the strings evenly for better sound.
Tuning Frequency
With new strings, I check tuning with my tuner:
- At the start and end of each practice session
- After any significant playing
- First thing in the morning and last thing at night
The temperature changes between day and night affect new strings dramatically. Don't be surprised if your perfectly-tuned cello is flat in the morning.
String Maintenance to Extend String Life
An ounce of prevention is worth a pound of expensive strings for any cello student.
Regular Cleaning
I wipe my strings with a dry cloth after every practice session. It takes 10 seconds and extends string life by months by removing corrosive oils and rosin dust that can lead to string breaks.
The difference between a well-maintained string and a neglected one is striking – both in appearance and sound quality on your cello.
Identifying Worn Strings
Learn to spot these warning signs on your instrument:
- Unwinding or fraying anywhere along the string
- Dull, lifeless tone that no amount of rosin fixes
- Constant tuning issues
- Visible discoloration or corrosion
- False notes or unreliable intonation
My A string starts to sound thin and scratchy when it's ready for replacement, while my C string develops a fuzzy quality that affects the sound of my cello.
Optimal Replacement Schedule
Different playing levels have different needs:
- Professional musicians: Every 3-6 months
- Serious cello students: Every 6-12 months
- Occasional players: Every 12-18 months
I mark string change dates on my calendar. My A string typically needs replacement twice as often as my C string.
Environmental Factors
Your strings' environment matters:
- Keep humidity between 40-60% (I use a case humidifier in winter)
- Avoid extreme temperature swings that affect your instrument
- Wash hands before playing to reduce corrosion from skin oils
- Store your cello properly when not in use
I ruined a set of strings by practicing in a hot, humid room all summer. Now I have a hygrometer in my case to monitor conditions that might affect my string life.

Conclusion
Changing cello strings doesn't have to end in string breaks and frustration. With proper technique, patience, and a few insider tricks from this guide on how to change cello strings without breaking them, you can master this essential skill and save yourself money and stress.
Remember the key points:
- Always change just one string at a time on your cello
- Use pencil graphite in string grooves
- Wind strings neatly and evenly on your instrument
- Tune gradually over several days with your tuner
- Maintain proper humidity for your cello
What used to take me an hour of anxiety now takes 10 minutes of calm focus. String changing has become routine maintenance rather than emergency surgery for my instrument.
Ready to Change Your Cello Strings With Confidence?
Go for it! Get yourself some quality strings that match your playing level and budget, gather your tools, and set aside an unhurried hour. Your improved sound will be worth it, and you'll join the ranks of self-sufficient cello students who don't panic at the first sign of a worn string.
FAQ About Changing Cello Strings
How often should I change my cello strings?
Most cello students change strings every 6-12 months, depending on how much we play. I'm in two orchestras and teach music, so I replace my A string every 4 months, D and G twice a year, and C annually. If your strings look worn, sound dull, or won't stay in tune, it's time for new strings regardless of age.
Can I change all four strings at once?
Please don't! I made this mistake as a beginner cello student and ended up with a repair bill larger than the cost of my strings. Change one string at a time to keep tension balanced and prevent your bridge and soundpost from shifting or falling.
Why does my A string keep breaking during changes?
The A string is the string equivalent of delicate crystal – thin and under high tension. Common culprits for string breaks include sharp edges on your bridge or nut, overtightening, or using poor quality strings. My breakthrough came when I started using lots of graphite in the string groove and tuning with glacial slowness.
Should I use different techniques for different string brands?
Yes! Different strings have different personalities on your cello:
- Synthetic core strings are more flexible and forgiving
- Steel strings will kink if bent too sharply
- Gut strings (if you're brave enough to use them) need babying and gradual tensioning
I always read the manufacturer's notes that come with premium strings – they often include specific handling tips to prevent string breaks.
How can I make my strings last longer?
I've doubled my string life with these habits:
- Wiping strings after every play session
- Washing hands before touching my cello
- Using a humidifier in dry weather
- Never touching the playing length with my fingers
- Using proper bow technique to avoid excess wear
What's the best string changing order to follow?
I prefer the bottom-up approach: C, G, D, then A. This maintains better bridge balance throughout the process. If I'm only changing one string, I don't worry about the order, but I still follow all the careful handling steps I learned in my online cello course.
Is it normal for new strings to go out of tune frequently?
Absolutely! New strings stretch like new elastic. For the first week, expect to retune every time you pick up your cello – sometimes even during longer practice sessions. This isn't a sign you've done anything wrong; it's just how strings break in. After 5-7 days of regular playing and tuning, they'll stabilize and produce a better sound.
Katherine Dvoskin, Co-Founder of K&M Music School
She is co-founder of K&M Music School in San Diego, is a passionate music educator with over 25 years of experience. She offers expert piano lessons in San Diego. At K&M Music School, we teach Piano, Violin, Cello, Saxophone, Bassoon, Harp, Voice, and Toddler group lessons. Katherine's blog shares insights on music education, covering topics from toddler music group lessons to adult music lessons. Whether you're seeking private music lessons or group music lessons for toddlers near you, welcome to K&M Music School.

